Deploying Cloudlets
What are Cloudlets?
EdgeXR cloudlets are self-contained, self-managed entities that can deploy Edge applications in selected locations around the globe on heterogenous operator Infrastructure. Developers can leverage these edge clouds for internal operator workloads to run their applications on mobile network edge infrastructure. We offer two ways to deploy your cloudlets, Direct and Restricted access which are explained in detail below along with deployment steps needed for following each method.
By default, cloudlets will be defined as public and are accessible for all the EdgeXR developers to deploy their application instances. If the operator wishes to set up cloudlet as private and is accessible to only users within the operator organization or operator designated developers, please refer to our Cloudlet Pools section to define cloudlet in cloudlet-pool and associate only designated organizations to access the cloudlet.
What are Auto-Clusters?
Auto-clusters (reservable clusters) allow Developers that are part of a private cloudlet or cloudlet pool to utilize compute resources on a cloudlet to deploy their application instances or containers that best suit their deployment. As an operator, you can specify whether to create the cluster manually or automatically for each private cloudlet. While the platform does not currently enforce this, you must either choose one or the other method to create the cluster (auto or manual). Auto-clusters are owned by EdgeXR and reserved to the organization that owns the app instances for the lifetime of that app instance. The EdgeXR Platform manages the creation and cleanup of the cluster instances. As an operator, you cannot delete reservable clusters; they become unreserved once an app instance associated with that auto-cluster is deleted, allowing other app instances to utilize the reservable cluster. Idle reservable clusters are removed by the EdgeXR platform, which is configurable on a regional basis and is currently performed every 30 minutes. While reservable clusters are not displayed on the Cluster Instances page in the UI, you can use a CLI command to view reservable clusters: mcctl clusterinst show region=EU reservable=true.
What is Trust Policy?
When you create a trust policy (optional), you are replacing the default security group rule that permits all outbound traffic with specific outbound traffic rules that you define in your trust policy. Trust policies are applied to cloudlets where you can apply rules to block all ports, some ports, or no ports. Once you apply the trust policy to the cloudlet, any applications that are marked trusted will be deployed to the trusted cloudlet where the outbound traffic rules are applied to those specific applications.
Some things to note about trust policies:
Security group rules that are implemented are defined by the rules of the trust policy.
Application instances can use all the outbound ports from the trust policy and are not restricted to just the application's required outbound connections list.
There are no restrictions to deploy trusted applications to non-trusted cloudlets.
You cannot delete or modify trust policies where there are existing application instances depending on those policies (required outbound connections); however, you can delete or modify trust policies if they do not conflict with any deployed applications requiring outbound connections, even though the application is using them. Last, applications can use all outbound ports within the trust policy regardless of what is listed in the application's required outbound connections.
Deployments must have the following list of ports to allow for outbound traffic in the trust policy:
DNS: UDP/53
To allow Envoy image to be pulled: TCP/443
NTP: UDP/123
To create a Trust Policy:
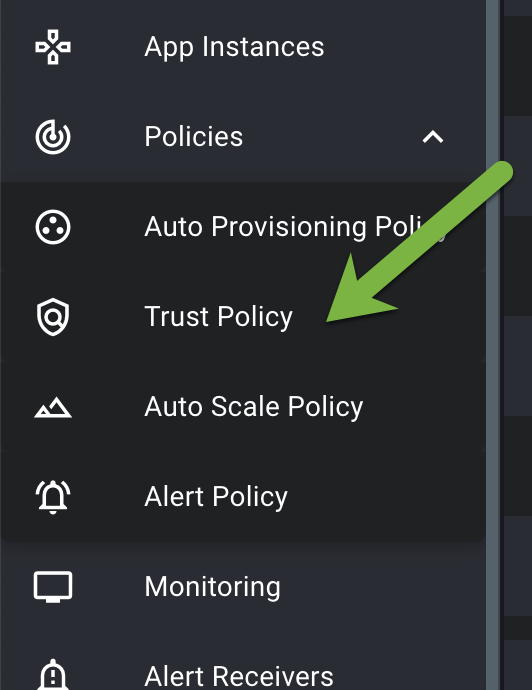
On the left-hand navigation, select Policies. Then, from the dropdown menu, select Trust Policy. The Trust Policy menu opens.
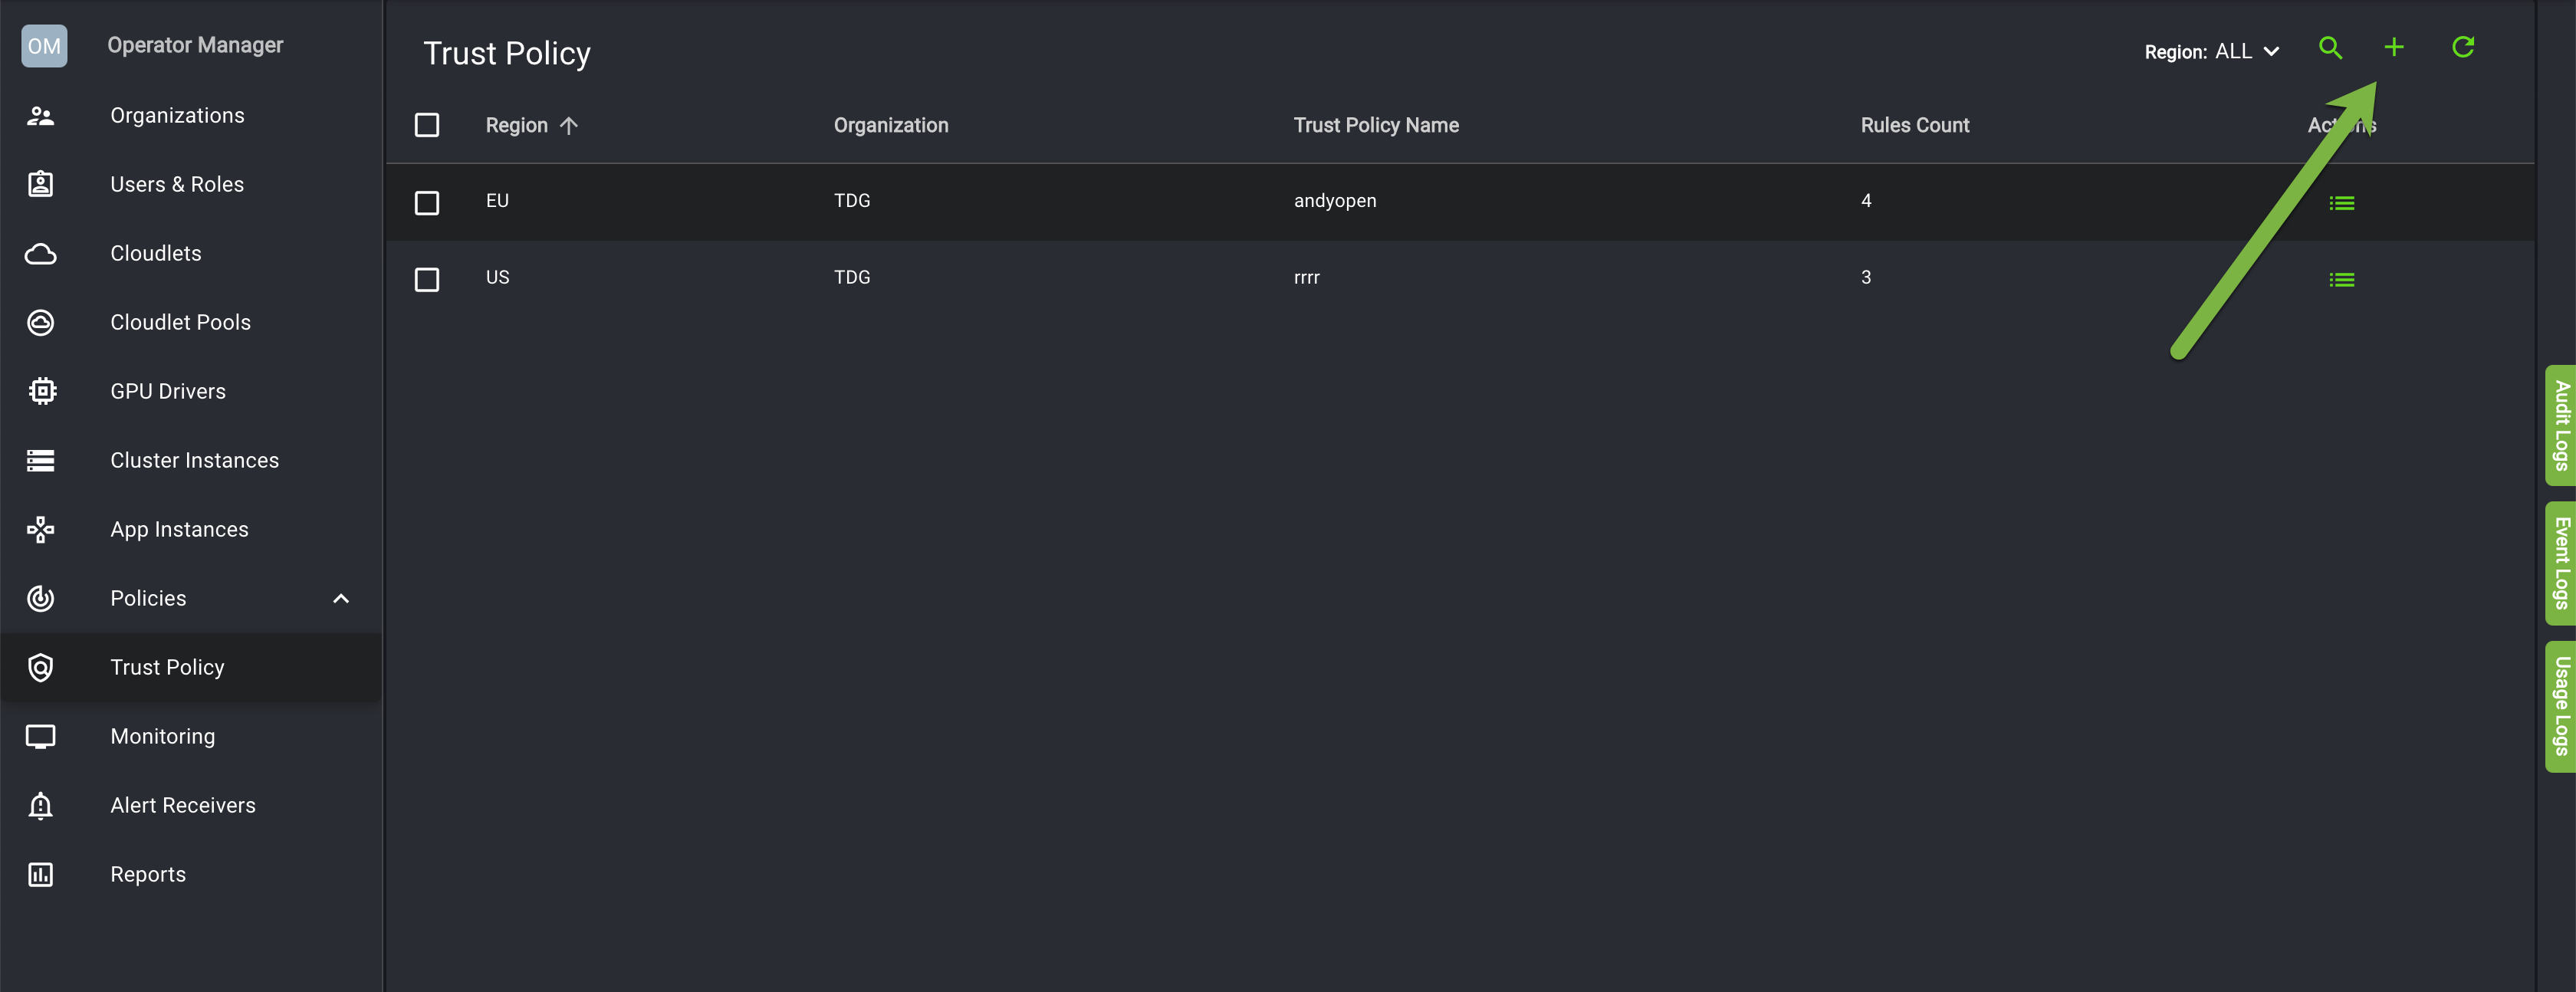
On the Trust Policy screen, select the plus icon in the top right. This will open the Create Trust Policy menu.
Toggle the Full Isolation mode to disable it. The Outbound Security Rules section appears. If you want to block all ports, you must enable Full Isolation mode.

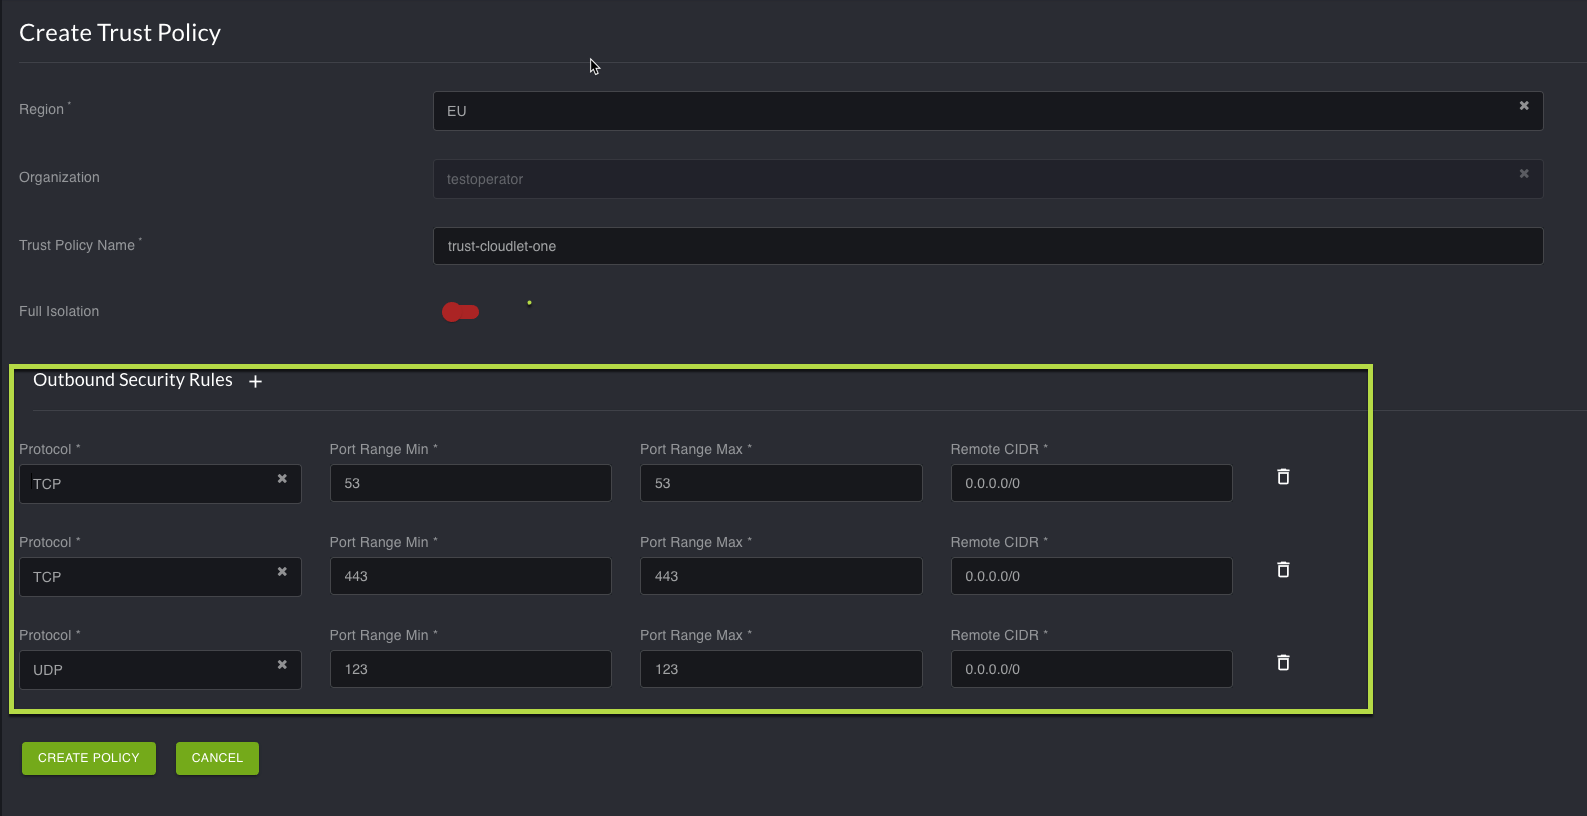
Set up your Outbound Security Rules and click Create Policy.
Apply the Trust Policy to the cloudlet. This step is performed during the creation of the cloudlet.
Mark applications as trusted and specify the required ports for the applications.
What are EdgeBox Cloudlets?
As an OperatorManager, you can enable members of your organization to onboard cloudlets, run and deploy edge applications, and test locally without impacting existing network infrastructure. When you create an operator organization, the organization is operating in a default restricted mode: edge-box only, which only allows members within your organization to deploy cloudlets locally on their machine. To change this default mode, contact [email protected] to lift the restriction and allow members of your organization to deploy onto Operator cloudlets. They can specify the platform type as platformtype=PlatformTypeEdgebox or they can select EdgeBox from the PlaftformType field on the Create Cloud page.
For more information about EdgeBox, see EdgeBox Proof of Concept Testing.
Direct access
In Direct access, API Access to the Operator Infra endpoint (eg: Openstack/vCD auth URL) should be directly reachable from EdgeXR console via the internet. Also, the Operator Infra External Network should be able to reach EdgeXR public endpoints via the Internet without any firewall restrictions.
To create and deploy cloudlets using Direct access
From the Edge-Cloud Console, select Cloudlets from the left navigation.
Click the plus icon on the upper top right-hand corner to open the Create Cloudlet page.
Notice that there are two tabs available on the right side of the screen that you can toggle between. The Cloudlet Location tab lets you navigate within the map view to access all available cloudlets. The following hand icons are available:Finger icon: Changes to the finger pointer when you hover over a cloudlet marker.
Hold pointer: Changes to the Hold pointer when you drag your mouse.
Hand pointer: Click to place a marker on a specific area.
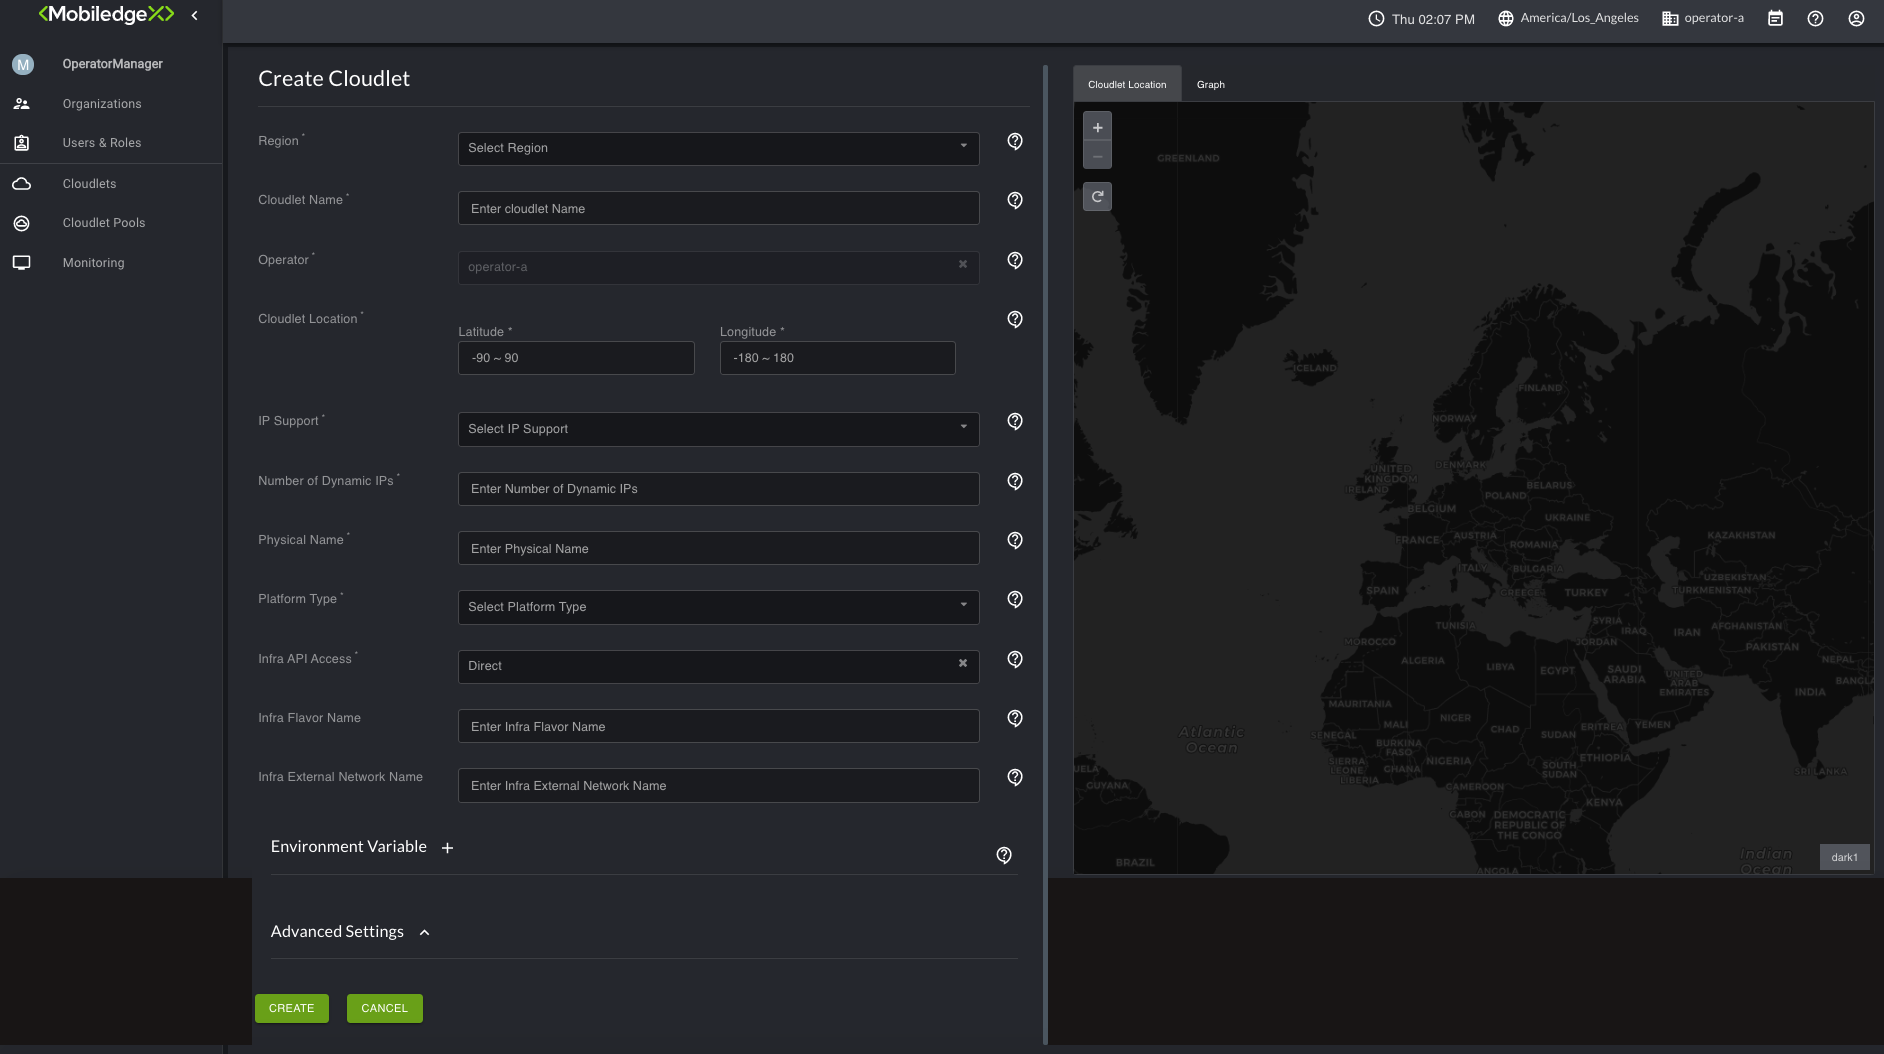
For Region, select a region from the drop-down list to deploy the cloudlet.
Type in a name you preferred for the cloudlet under Cloudlet Name.
The Operator field is required should contain the name of the organization you created.
For Cloudlet Location, enter the cloudlet’s coordinates. This value can be changed in the future with the "Update Cloudlet" Option.
For IP support, Dynamic is the only supported option. Dynamic mode indicates that the cloudlet will use Operator Infra DHCP service to provide the IP addresses (could be Public, Floating or Private addresses that Operator needs to NAT to the internet).
In the Number of Dynamic IP's field, type in the number of Dynamic IP addresses that are desired.This value can be changed in the future with the Update Cloudlet Option.
For Physical Name, type in an arbitrary physical name for the cloudlet (could be even the same as cloudlet name). This cloudlet physical name is used as an identifier in EdgeXR internal systems for the Operator Infra credentials (for eg: OpenRC & CACert data's in the case of Openstack). So any future cloudlets defined on the same Operator infrastructure can point to the same physical name.
In the Platform Type field, select one of the supported platform types: OpenStack,vSphere, or VCD. If you select OpenStack, additional fields associated with it (Refer Steps 11 and 12 ) appear. Based on the below conditions, you can choose either to populate the data or leave those fields blank.
If you have OpenRC & CACert of your Infra handy, provide the details as mentioned in Steps 11 and 12. Please contact EdgeXR Support in case any modifications needed in the future.
If you don't have OpenRC & CACert of your Infra handy, please leave the below fields blank and provide the details once obtained to EdgeXR Support, so they can update it based on the Physical Name you mentioned during cloudlet creation.
For OpenRC Data, leave this field blank if EdgeXR will upload it on your behalf. If you need to upload a new one, here is an example of an OpenRC file.
OS_AUTH_URL=https://openstack.api.enpoint.url/v3
OS_PROJECT_ID=b6565354422a454c965078640ad4398e
OS_PROJECT_NAME=project_name
OS_USER_DOMAIN_NAME=Default
OS_PROJECT_DOMAIN_ID=default
OS_USERNAME=osuser
OS_PASSWORD=ospassword
OS_REGION_NAME=RegionOne
OS_INTERFACE=public
OS_IDENTITY_API_VERSION=3
For CACert Data, you must upload the CACert Data file if the
OSAUTHURLis https-based. Otherwise, if you’re using http, this field is not required.
----BEGIN CERTIFICATE-----
LVRlbGVTZWMgR2xvYmFsUm9vdCBDbGFzcyAyMB4XDTE0MDIxMTE0MzkxMFoXDTI0
BAYTAkRFMSswKQYDVQQKDCJULVN5c3RlbXMgRW50ZXJwcmlzZSBTZXJ2aWNlcyBH
bWJIMR8wHQYDVQQLDBZULVN5c3RlbXMgVHJ1c3QgQ2VudGVyMSUwIwYDVQQDDBxU
LVRlbGVTZWMgR2xvYmFsUm9vdCBDbGFzcyAyMB4XDTE0MDIxMTE0MzkxMFoXDTI0
MDEQMA4GA1UEBwwHTmV0cGhlcdefMB4GA1UECQwXVW50ZXJlIEluZHVzdHJpZXN0
SW50ZXJuYXRpb25hbCBHbWJIMR8wHQYDVQQLDBZULVN5c3RlbXMgVHJ1c3QgQ2Vu
dGVyMRwwGgYDVQQIDBNOb3JkcmhlaW4gV2VzdGZhbGVuMQ4wDAYDVQQRDAU1NzI1
MDEQMA4GA1UEBwwHTmV0cGhlcdefMB4GA1UECQwXVW50ZXJlIEluZHVzdHJpZXN0
ci4gMjAxJjAkBgNVBAMMHVRlbGVTZWMgU2VydmVyUGFzcyBDbGFzcyAyIENBMIIB
IjANBgkqhkiG9w0BAQEFAAOCAQ8AMIIBCgKCAQEA3oxwJVY3bSb6ejJ42f9VEt1N
vW2swwllcs5ifPsHAulpSoFc2Y9gMOKQqkuyjN1foCegDDeEr6FBLD5YuROldcX8
2aDNBKDh9GpSJYZMLrYwlfR4EJUGwLidHDn93H95j1M67sNlCyCfcbso0zFBQzXK
KO06sbC1QH9M1Xdrltz8bQS+LbGRTM5JcPYhhxXcnsFstQVaGmfqFQitPXhT3g9+
AQABo4IB2TCCAdUwEgYDVR0TAQH/BAgwBgEB/wIBADBDBgNVHSAEPDA6MDgGBFUd
Ghvzd09jjMT6f8Q8pAlyGFTGuxsEjeU/rrS/yKU8bFEEvuR5WT/I4Kme+8OlzQID
AQABo4IB2TCCAdUwEgYDVR0TAQH/BAgwBgEB/wIBADBDBgNVHSAEPDA6MDgGBFUd
IAAwMDAuBggrBgEFBQcCARYiaHR0cDovL3BraS50ZWxlc2VjLmRlL2Nwcy9jcHMu
aHRtbDAOBgNVHQ8BAf8EBAMCAQYwge8GA1UdHwSB5zCB5DA1oDOgMYYvaHR0cDov
L3BraS50ZWxlc2VjLmRlL3JsL0dsb2JhbFJvb3RfQ2xhc3NfMi5jcmwwgaqggaeg
gaSGgaFsZGFwOi8vcGtpLnRlbGVzZWMuZGUvQ049VC1UZWxlU2VjJTIwR2xvYmFs
Um9vdCUyMENsYXNzJTIwMixPVT1ULVN5c3RlbXMlMjBUcnVzdCUyMENlbnRlcixP
PVQtU3lzdGVtcyUyMEVudGVycHJpc2UlMjBTZXJ2aWNlcyUyMEdtYkgsQz1ERT9B
dXRob3JpdHlSZXZvY2F0aW9uTGlzdDA4BggrBgEFBQcBAQQsMCowKAYIKwYBBQUH
MAGGHGh0dHA6Ly9vY3NwLnRlbGVzZWMuZGUvb2NzcHIwHQYDVR0OBBYEFJTIdEb1
OrRGSCb4K8o0HlYmBBIAMB8GA1UdIwQYMBaAFL9ZIDYAeaCgImuM1fJh0rgsy4JK
MA0GCSqGSIb3DQEBCwUAA4IBAQB55S9CfCkclWVtUIxl2c4aM5wqlLZRZ7zVhynK
KOhWKyTw+D2BOjc+TXIPkgRMqF3Sn8ZD4UTOARboJxswYnLZDkvBuvTbYa+N52Jy
oBP2TXIpEWEyJl7Oq8NFbERwg4X6MabLgjGvJETicPpKGfAINKDwPScQCsWHiCaX
X50cZzmWw17S0rWECOvPEt/4tXJ4Me9aAxx6WRm708n/K8O4mB3AzvA/M7VUDaP9
8LtreoTnWInjyg/8+Ahtce3foMXiIP4+9IX7fbm6yqh4u33tqMESDcRP6eGdzq4D
qnHyIvj9XNpuGgMvDgq357kZQS9e5XVH5icSvW1kr2kX2f1t
-----END CERTIFICATE-----
For Infra API Access, select Direct. This infers that the Operator API Infra endpoint is directly accessible from the public network and the Operator Infra External Network should also be able to reach the Internet.
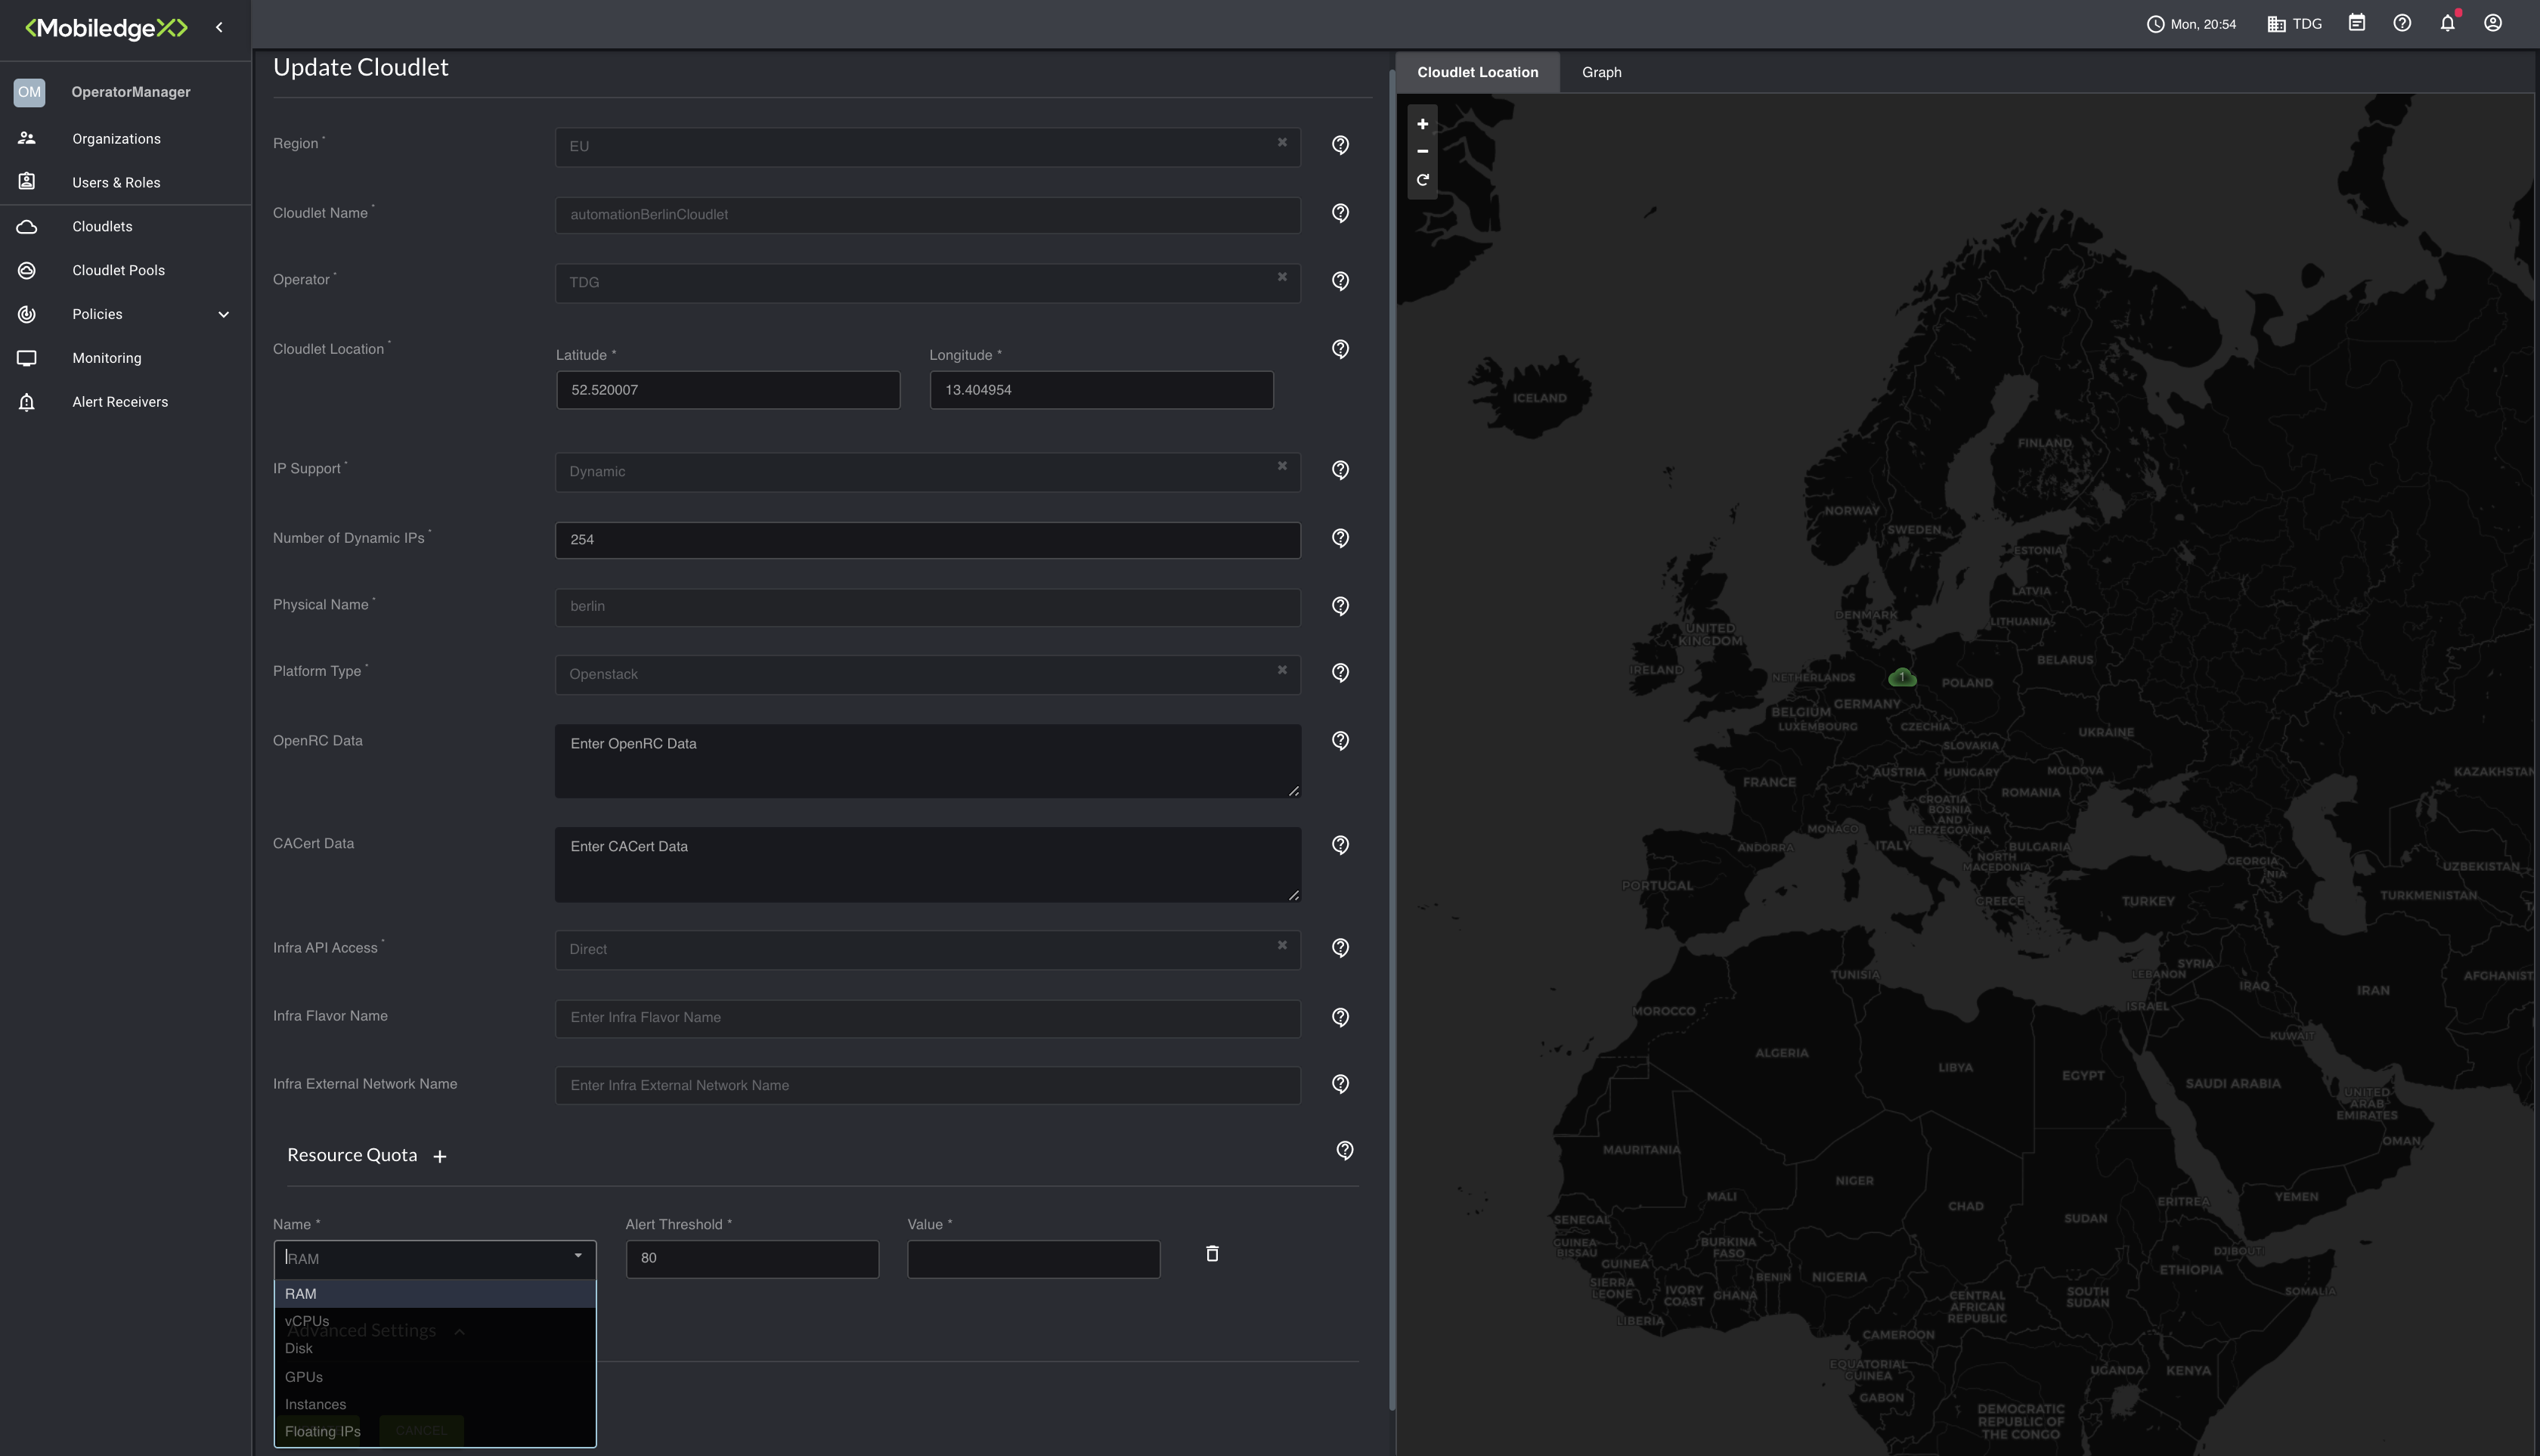
Scroll down to the Resource Quota section and click the + sign to add resource management to track things such as RAM/vCPUs, Floating IPs, and GPU usage. The Alert threshold can contain values between 0% to 100%. The default is 80%. Things to note:
vCPUs/RAM are resources that are common to all platforms.
GPU is a controller-side resource and is not managed by the CRM. Instead, the Controller keeps track of the GPU flavor used.
Other available resources, such as instances and Floating IPs are specific to the Openstack platform.
Scroll down to Advanced Settings. If you created a Trust Policy, specify it here. Otherwise, you can skip this step.
Once all the required fields are populated, click Create where a Progress bar appears and provides live status of the cloudlet deployment process.
Select the Progress indicator to view the updated state as the cloudlet is being deployed. Refreshing may to 15 minutes to complete.
Once the cloudlet spinup starts, the state will change to init. This change may take up to five minutes.
Once the cloudlet is available, the state will change to Online.
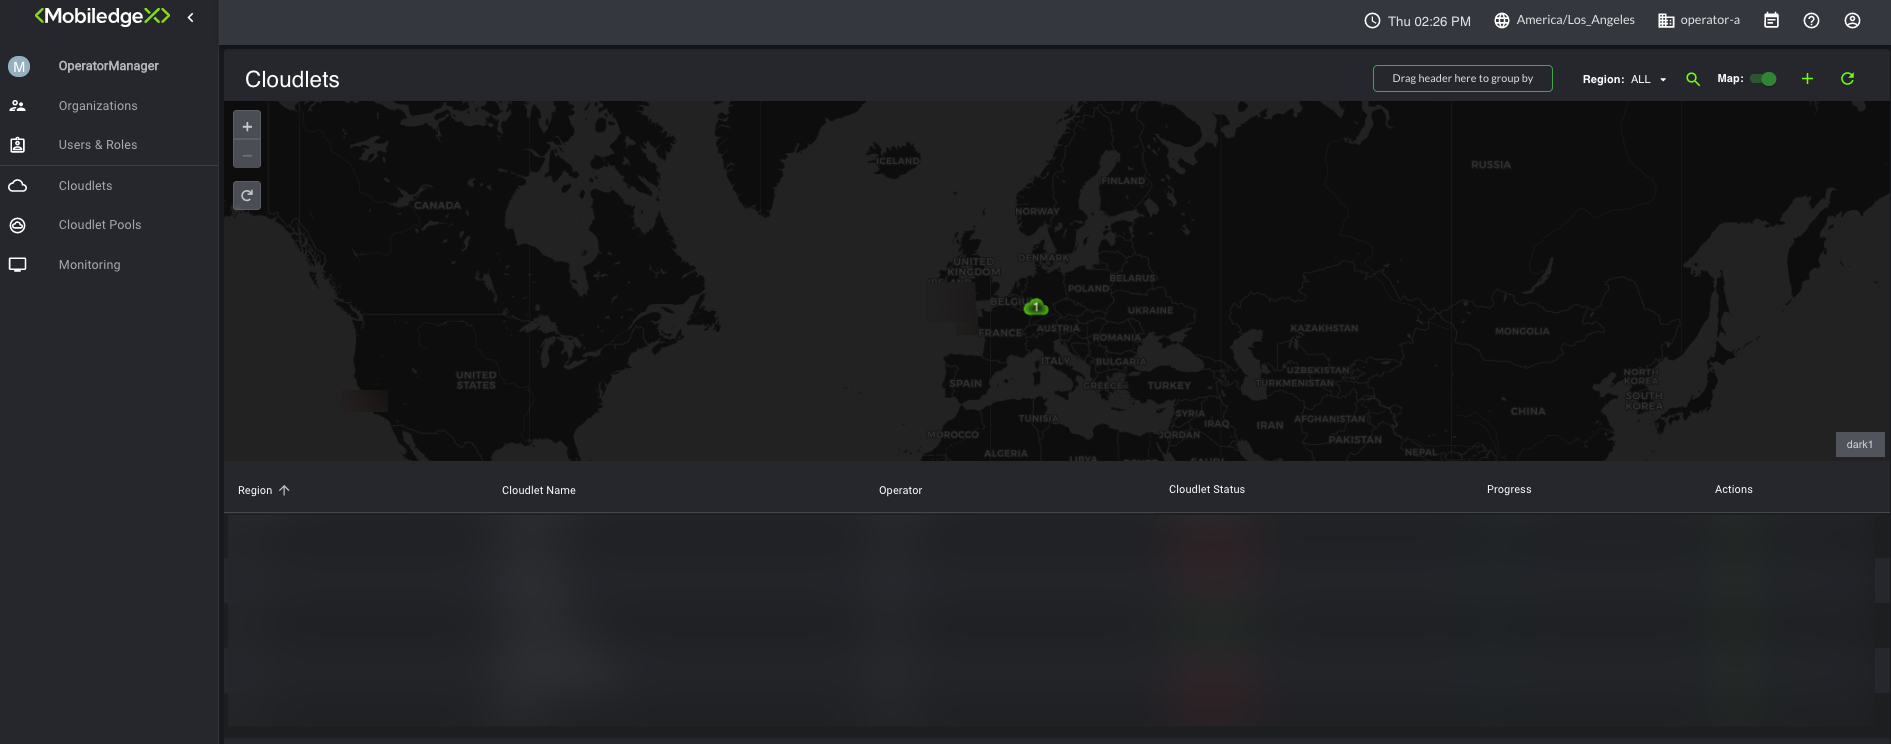
You’re done! The deployed cloudlet can now be viewed from the Cloudlets page.
If you wish to add resource management after you have created the cloudlet, you can go back and update your cloudlet to add the resources.
Restricted access:
Restricted access deployment is used in the Operator scenarios where API Access to Operator Infra endpoint (for eg: Openstack/vCD auth URL ) is on the isolated network or behind NAT/Firewall and is not directly reachable from EdgeXR console. In this case, as well, Operator Infra External Network should be able to reach EdgeXR public endpoints via the Internet without any firewall restrictions.
To create and deploy cloudlets using Restricted access
From the Edge-Cloud Console, navigate to the Cloudlets submenu.
Click the + sign on the upper top right-hand corner to open the Create Cloudlet page.
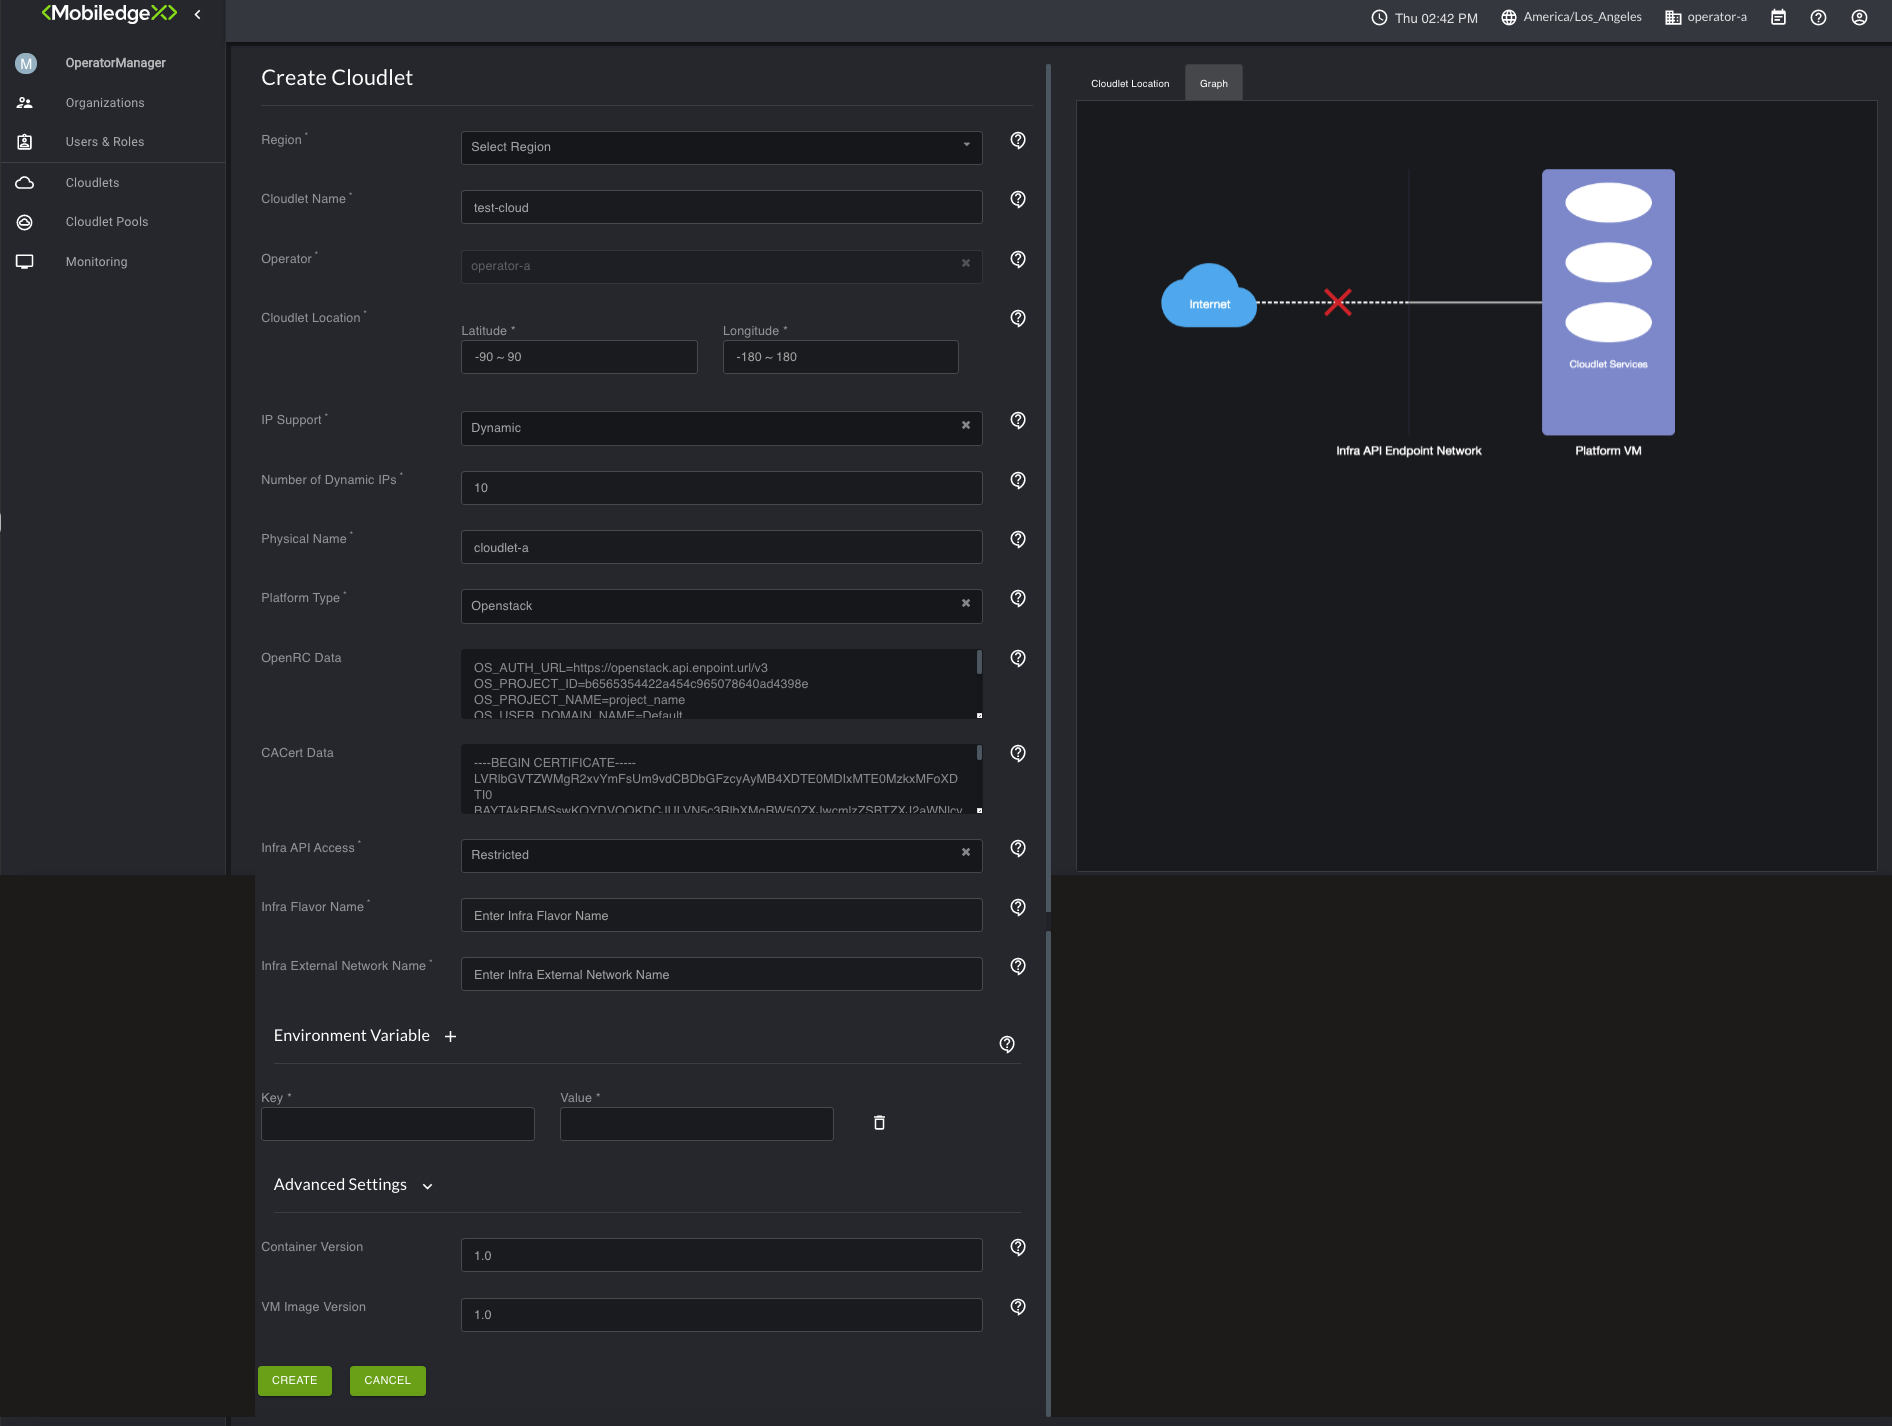
For Region, select a region from the drop-down list to deploy the cloudlet.
Type in a name for your cloudlet under Cloudlet Name.
The Operator field is required and should contain the name of the organization you created.
For Cloudlet Location, enter the cloudlet’s coordinates. This value can be changed in the future with the "Update Cloudlet" Option.
For IP support, Dynamic is the only supported option. Dynamic mode indicates that the cloudlet will use Operator Infra DHCP service to provide the IP addresses (could be Public, Floating, or Private addresses that Operator needs to NAT to the internet).
In the Number of Dynamic IPs field, type in the number of Dynamic IP addresses that are desired. This value can be changed in the future with the "Update Cloudlet" Option.
For Physical Name, type in an arbitrary physical name for the cloudlet (could be even same as cloudlet name). This cloudlet physical name is used as an identifier in EdgeXR internal systems for the Operator Infra credentials (for eg: OpenRC & CACert data's in the case of Openstack). So any future cloudlets defined on the same Operator infrastructure can point to the same physical name.
n the Platform Type field, select one of the supported platform types -OpenStack, vSphere, or VCD. If you select OpenStack, additional fields associated with that platform selection appear. Based on the below conditions, you can choose either to populate the data or leave those fields blank.
If you have OpenRC & CACert of your Infra handy, provide the details as mentioned in Steps 11 and 12. Please contact EdgeXR Support in case any modifications to these values are needed in the future.
If you don't have OpenRC & CACert of your Infra handy, please leave the below fields blank and provide the details once obtained to EdgeXR Support, so they can update it based on the Physical Name you mentioned during cloudlet creation.
For OpenRC Data, leave this field blank if EdgeXR uploaded this file on your behalf. If you need to upload a new one, here is an example of an OpenRC file.
OS_AUTH_URL=https://openstack.api.enpoint.url/v3
OS_PROJECT_ID=b6565354422a454c965078640ad4398e
OS_PROJECT_NAME=project_name
OS_USER_DOMAIN_NAME=Default
OS_PROJECT_DOMAIN_ID=default
OS_USERNAME=osuser
OS_PASSWORD=ospassword
OS_REGION_NAME=RegionOne
OS_INTERFACE=public
OS_IDENTITY_API_VERSION=3
Note: Our system usually tries to resolve the DNS name of the OpenStack endpoint. So you may experience a DNS resolution cloudlet creation issue if your Openstack DNS AUTH URL is not resolvable by public DNS. To work it around, the suggestion is to use either IP of OpenStack endpoint or your OpenStack subnet should have DNS servers set which can resolve same.
For CACert Data, you must upload the CACert Data file if the
OSAUTHURLis HTTPS-based. Otherwise, if you’re using HTTP, this field is not required.
----BEGIN CERTIFICATE-----
LVRlbGVTZWMgR2xvYmFsUm9vdCBDbGFzcyAyMB4XDTE0MDIxMTE0MzkxMFoXDTI0
BAYTAkRFMSswKQYDVQQKDCJULVN5c3RlbXMgRW50ZXJwcmlzZSBTZXJ2aWNlcyBH
bWJIMR8wHQYDVQQLDBZULVN5c3RlbXMgVHJ1c3QgQ2VudGVyMSUwIwYDVQQDDBxU
LVRlbGVTZWMgR2xvYmFsUm9vdCBDbGFzcyAyMB4XDTE0MDIxMTE0MzkxMFoXDTI0
MDEQMA4GA1UEBwwHTmV0cGhlcdefMB4GA1UECQwXVW50ZXJlIEluZHVzdHJpZXN0
SW50ZXJuYXRpb25hbCBHbWJIMR8wHQYDVQQLDBZULVN5c3RlbXMgVHJ1c3QgQ2Vu
dGVyMRwwGgYDVQQIDBNOb3JkcmhlaW4gV2VzdGZhbGVuMQ4wDAYDVQQRDAU1NzI1
MDEQMA4GA1UEBwwHTmV0cGhlcdefMB4GA1UECQwXVW50ZXJlIEluZHVzdHJpZXN0
ci4gMjAxJjAkBgNVBAMMHVRlbGVTZWMgU2VydmVyUGFzcyBDbGFzcyAyIENBMIIB
IjANBgkqhkiG9w0BAQEFAAOCAQ8AMIIBCgKCAQEA3oxwJVY3bSb6ejJ42f9VEt1N
vW2swwllcs5ifPsHAulpSoFc2Y9gMOKQqkuyjN1foCegDDeEr6FBLD5YuROldcX8
2aDNBKDh9GpSJYZMLrYwlfR4EJUGwLidHDn93H95j1M67sNlCyCfcbso0zFBQzXK
KO06sbC1QH9M1Xdrltz8bQS+LbGRTM5JcPYhhxXcnsFstQVaGmfqFQitPXhT3g9+
AQABo4IB2TCCAdUwEgYDVR0TAQH/BAgwBgEB/wIBADBDBgNVHSAEPDA6MDgGBFUd
Ghvzd09jjMT6f8Q8pAlyGFTGuxsEjeU/rrS/yKU8bFEEvuR5WT/I4Kme+8OlzQID
AQABo4IB2TCCAdUwEgYDVR0TAQH/BAgwBgEB/wIBADBDBgNVHSAEPDA6MDgGBFUd
IAAwMDAuBggrBgEFBQcCARYiaHR0cDovL3BraS50ZWxlc2VjLmRlL2Nwcy9jcHMu
aHRtbDAOBgNVHQ8BAf8EBAMCAQYwge8GA1UdHwSB5zCB5DA1oDOgMYYvaHR0cDov
L3BraS50ZWxlc2VjLmRlL3JsL0dsb2JhbFJvb3RfQ2xhc3NfMi5jcmwwgaqggaeg
gaSGgaFsZGFwOi8vcGtpLnRlbGVzZWMuZGUvQ049VC1UZWxlU2VjJTIwR2xvYmFs
Um9vdCUyMENsYXNzJTIwMixPVT1ULVN5c3RlbXMlMjBUcnVzdCUyMENlbnRlcixP
PVQtU3lzdGVtcyUyMEVudGVycHJpc2UlMjBTZXJ2aWNlcyUyMEdtYkgsQz1ERT9B
dXRob3JpdHlSZXZvY2F0aW9uTGlzdDA4BggrBgEFBQcBAQQsMCowKAYIKwYBBQUH
MAGGHGh0dHA6Ly9vY3NwLnRlbGVzZWMuZGUvb2NzcHIwHQYDVR0OBBYEFJTIdEb1
OrRGSCb4K8o0HlYmBBIAMB8GA1UdIwQYMBaAFL9ZIDYAeaCgImuM1fJh0rgsy4JK
MA0GCSqGSIb3DQEBCwUAA4IBAQB55S9CfCkclWVtUIxl2c4aM5wqlLZRZ7zVhynK
KOhWKyTw+D2BOjc+TXIPkgRMqF3Sn8ZD4UTOARboJxswYnLZDkvBuvTbYa+N52Jy
oBP2TXIpEWEyJl7Oq8NFbERwg4X6MabLgjGvJETicPpKGfAINKDwPScQCsWHiCaX
X50cZzmWw17S0rWECOvPEt/4tXJ4Me9aAxx6WRm708n/K8O4mB3AzvA/M7VUDaP9
8LtreoTnWInjyg/8+Ahtce3foMXiIP4+9IX7fbm6yqh4u33tqMESDcRP6eGdzq4D
qnHyIvj9XNpuGgMvDgq357kZQS9e5XVH5icSvW1kr2kX2f1t
-----END CERTIFICATE-----
For Infra API Access, select Restricted. This infers that the API Infra endpoint is not accessible from the public network. Operator External Network should also be able to reach the Internet, If External network is behind NAT/Firewall, the Operator needs to change the needed settings to allow direct egress access to the internet.
Note: Steps 14 & 15 are mandatory for Restricted access deployment and the Operator needs to input the valid values based on what is actually configured on the Infrastructure.
For the Infra Flavor Name, provide the name of the flavor specific to the Operator Infra to deploy the PlatformVM. The recommended minimum hardware configuration includes 2 vCPU, 4GB RAM, and 40G disk space.
For the Intra External Network Name, provide the name of the external network specific to the Operator Infra where PlatformVM and all app clusters are deployed and should be able to egress to the internet and ingress from Operator handsets.
Scroll down to Advanced Settings. If you created a Trust Policy, specify it here. Otherwise, you can skip this step.
Once all the required fields are populated, click Create option, and then a popup screen will appear instructing the user to wait and download the cloudlet manifest template (usually a heat template for Openstack) and bringup the cloudlet services using this template in the remote infrastructure. EdgeXR console keeps showing the created cloudlet status as "Not Present" until the user brings up the cloudlet in his infrastructure via a template.
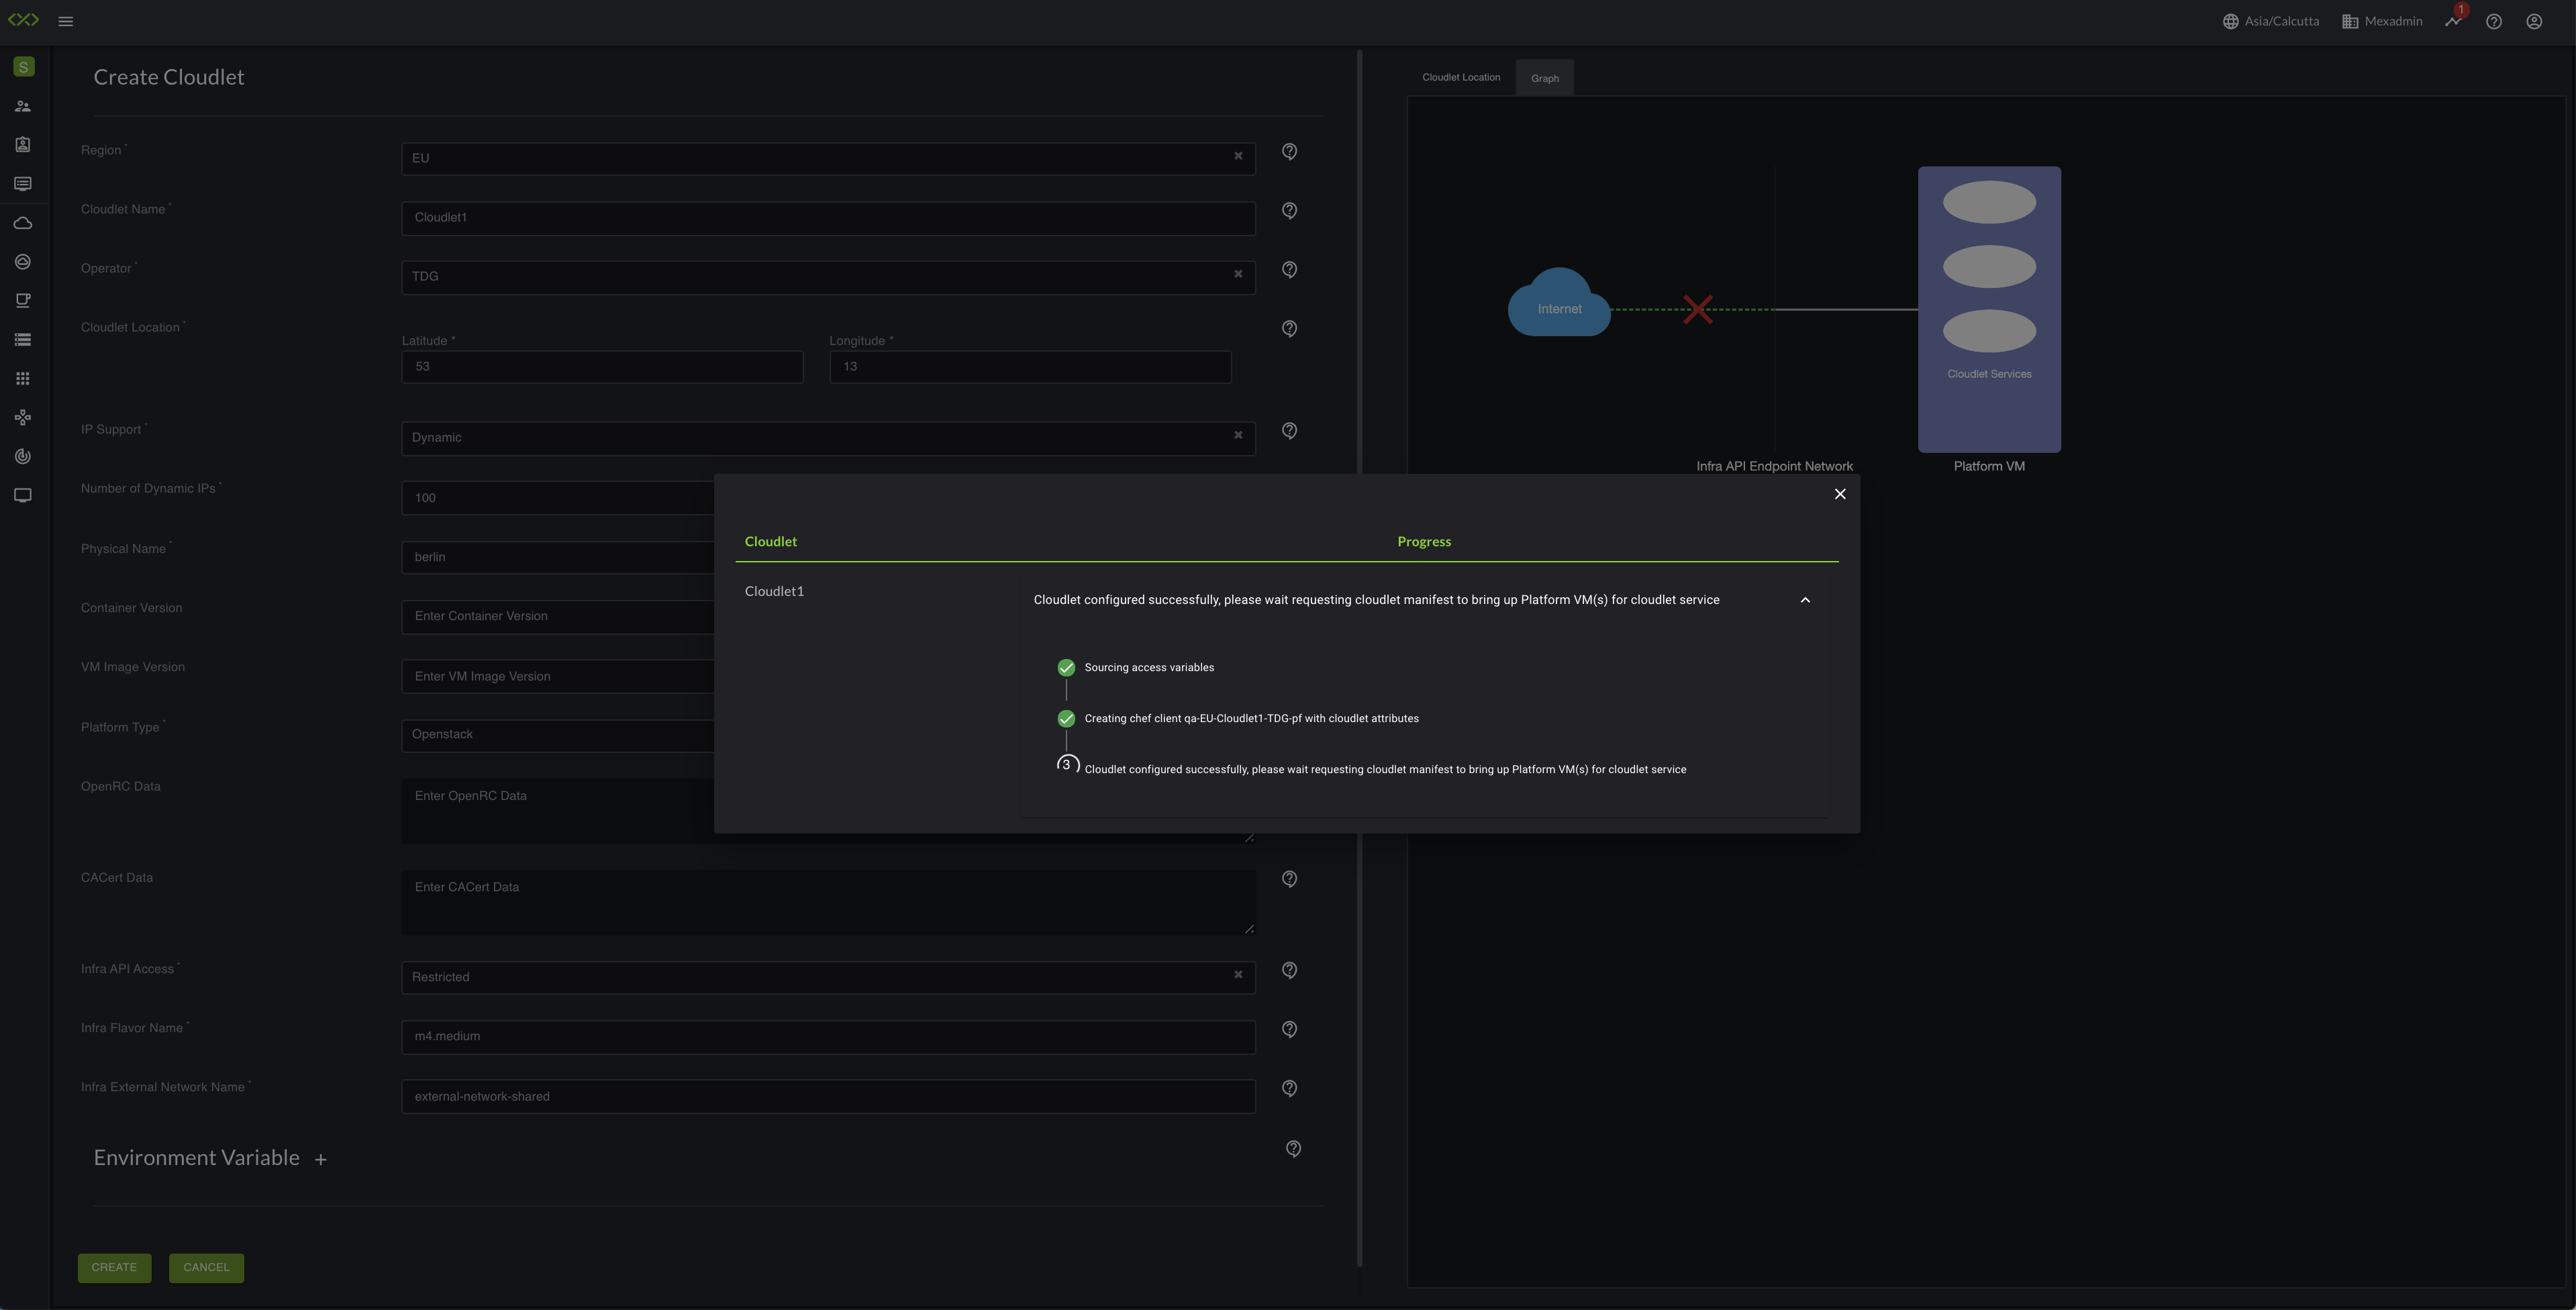
Once the cloudlet creation step is completed in the EdgeXR console, click the Show Manifest option from the Actions menu to bring up the Cloudlet Manifest file which will have pending restricted onboarding steps and also option to download the Cloudlet Manifest file which user need to run on on his IaaS infrastructure. Follow the below-mentioned steps to set up the cloudlet in restricted mode.
Download EdgeXR bootstrap VM base image
Upload base image to your IaaS infrastructure (for openstack upload image to Glance ).
Download Cloudlet Manifest file and run same in your IaaS infrastructure to create EdgeXR bootstrap VM
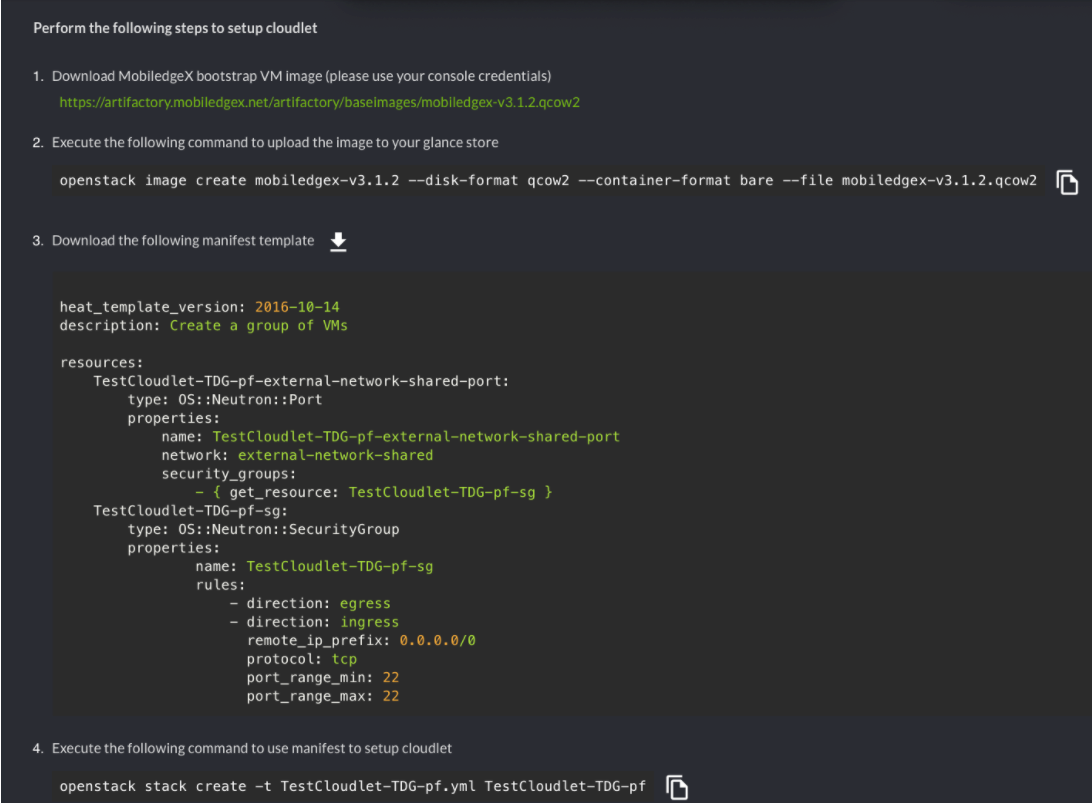
In the case of the Openstack IaaS infrastructure, execute the downloaded Cloudlet Manifest file a.k.a HEAT stack template via OpenStack stack create command, and wait for the EdgeXR bootstrap Platform VM to appear in your infrastructure. Once created, the Platform VM which will have an IP address to egress to the internet will automatically complete the cloudlet on-boarding.

Click the Progress indicator in the EdgeXR console to view the updated state as the cloudlet is being deployed. Refreshing may to 15 minutes to complete.
Once the cloudlet bringup starts, the state will change to init. This change may take up to 5 minutes.
Once the cloudlet is available, the state will change to Online.
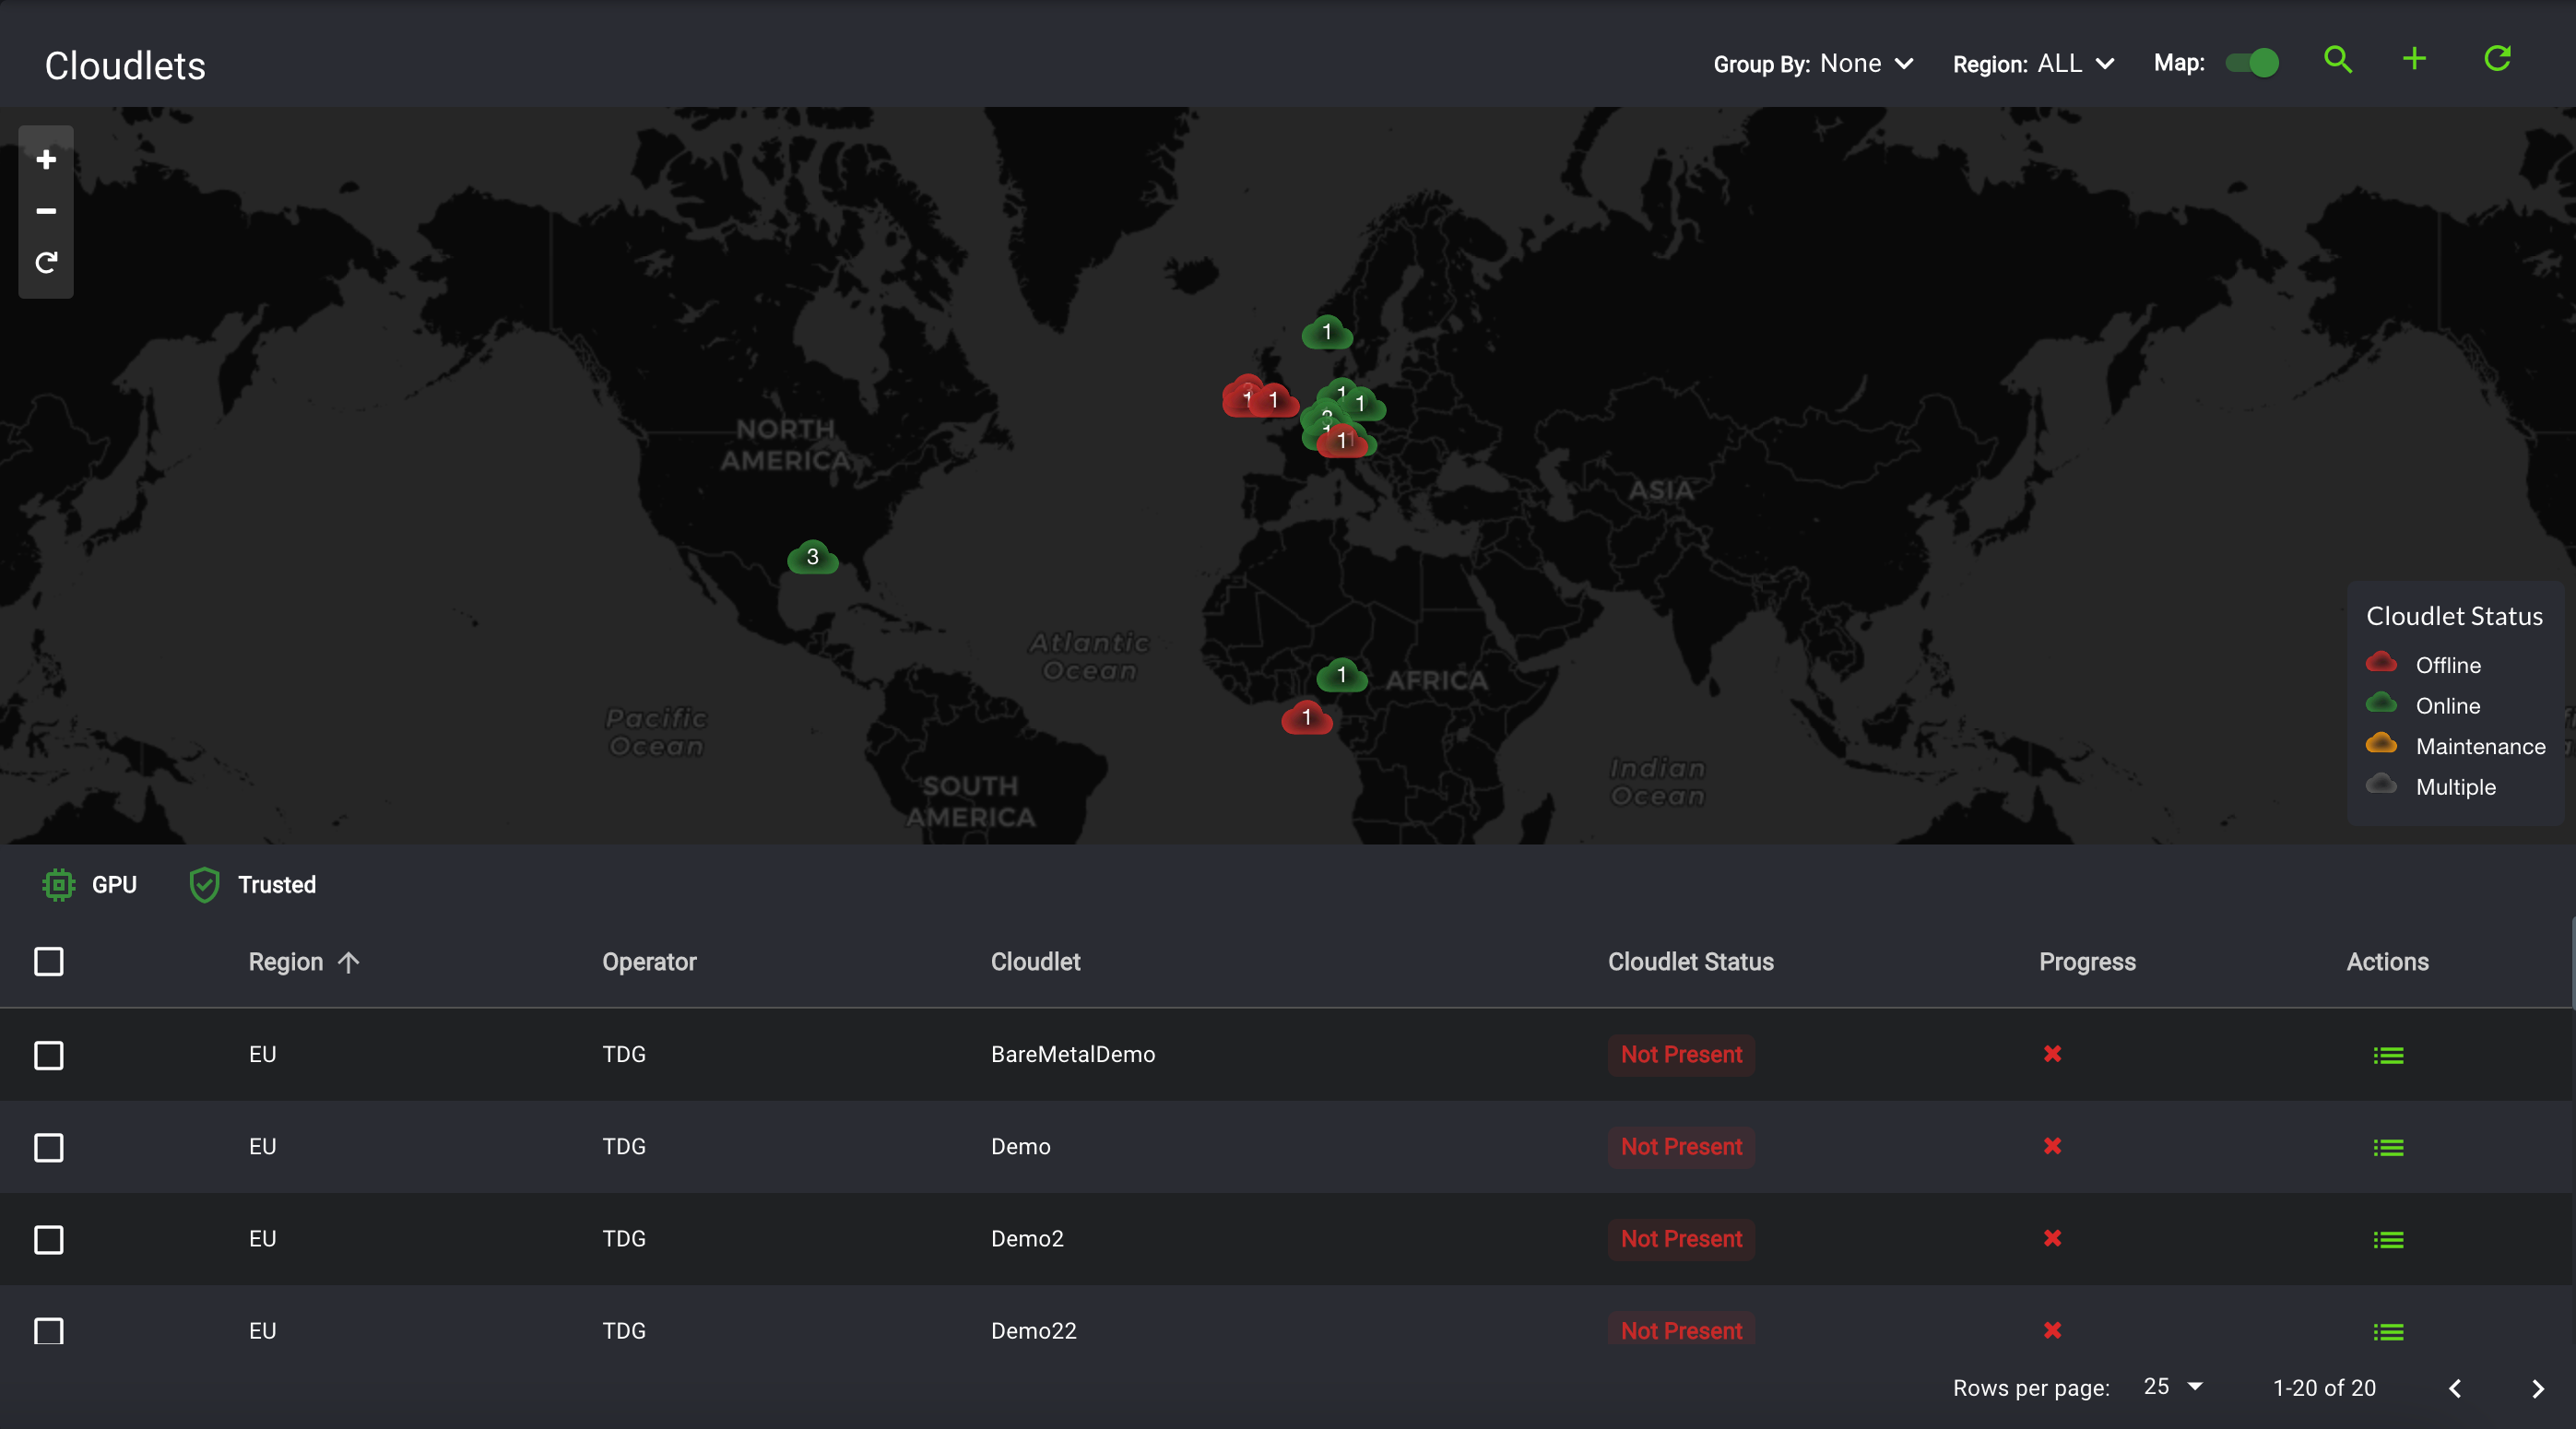
You’re done! The deployed cloudlet can now be viewed from the Cloudlets page. The example screenshot shows both online and offline cloudlets.
